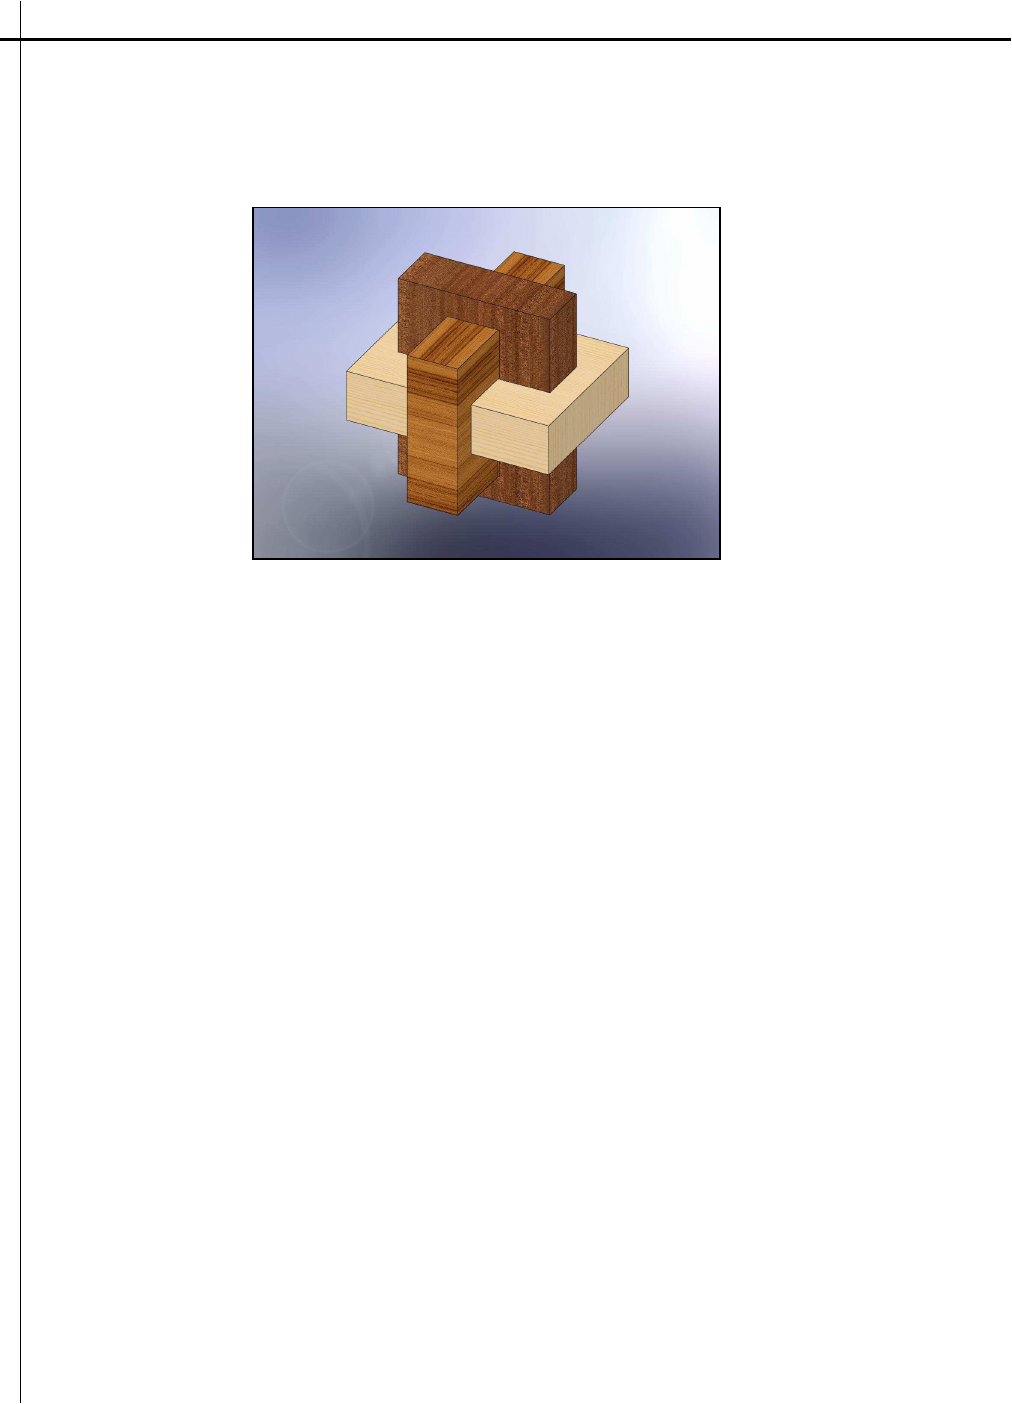
STEM Academy: General Fabrication Methods Wood Puzzle
1
Wood Puzzle
Equipment
A. Band Saw
B. Straight Edge
C. Combination Square
D. Miter Saw
E. Pencil
F. Safety Glasses
G. Two Bar Clamps
H. 3/4” Spade Bit
Materials
A. 1” x 4” x 8” Lumber
B. Sand Paper
a. 80, 120, 180 grit
C. Rubbing Oil
D. Cheese Cloth
E. Scrap Wood
F. Scrap Paper
STEM Academy: General Fabrication Methods Wood Puzzle
2
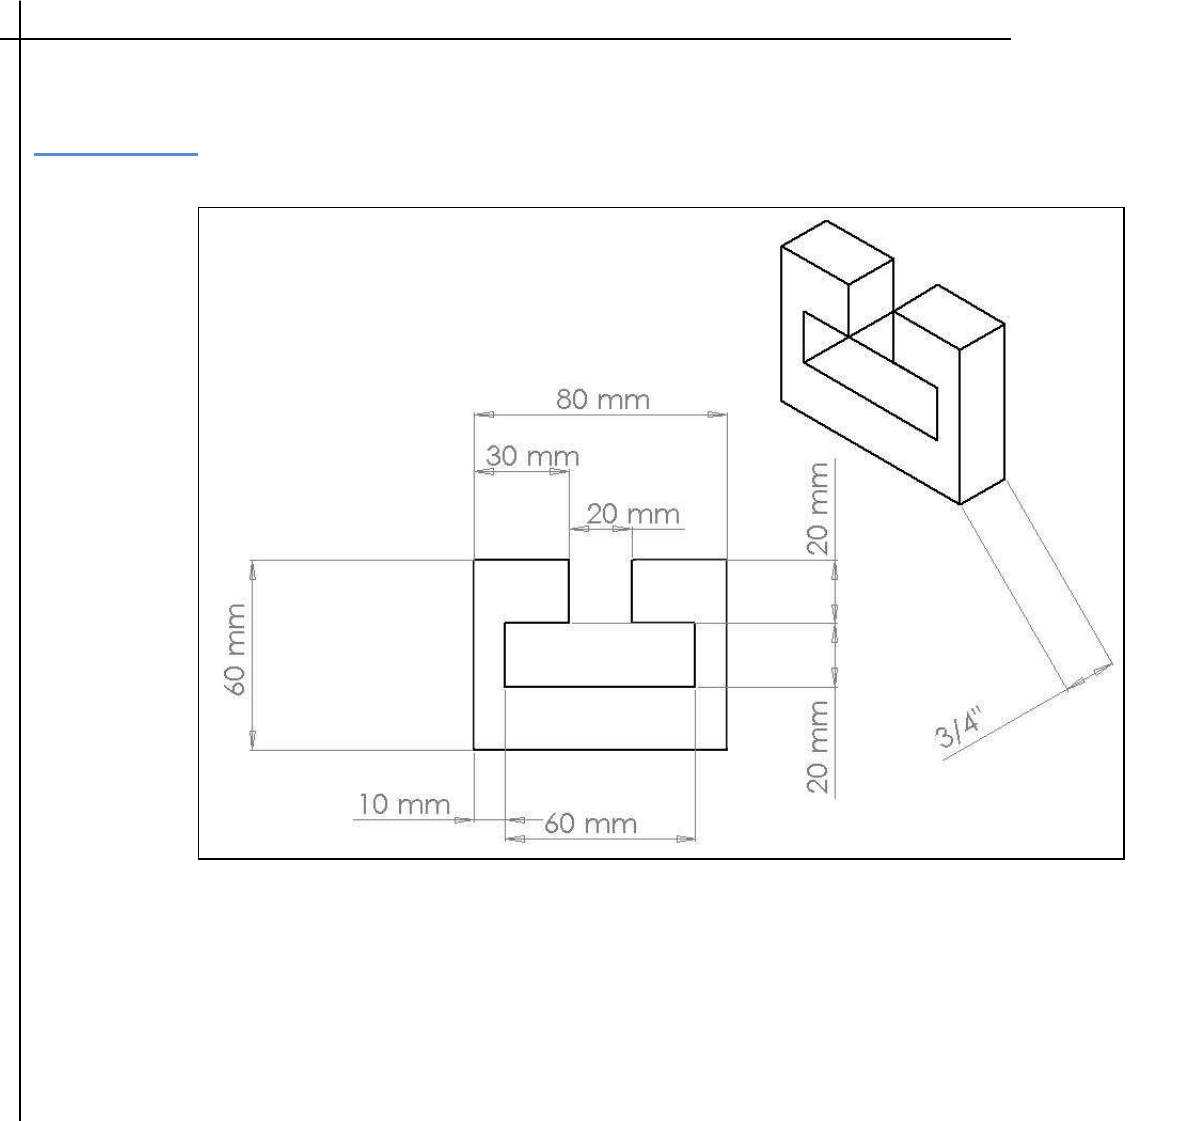
Drawing 1
:
Complete Dimensions
for Piece 1
STEM Academy: General Fabrication Methods Wood Puzzle
3
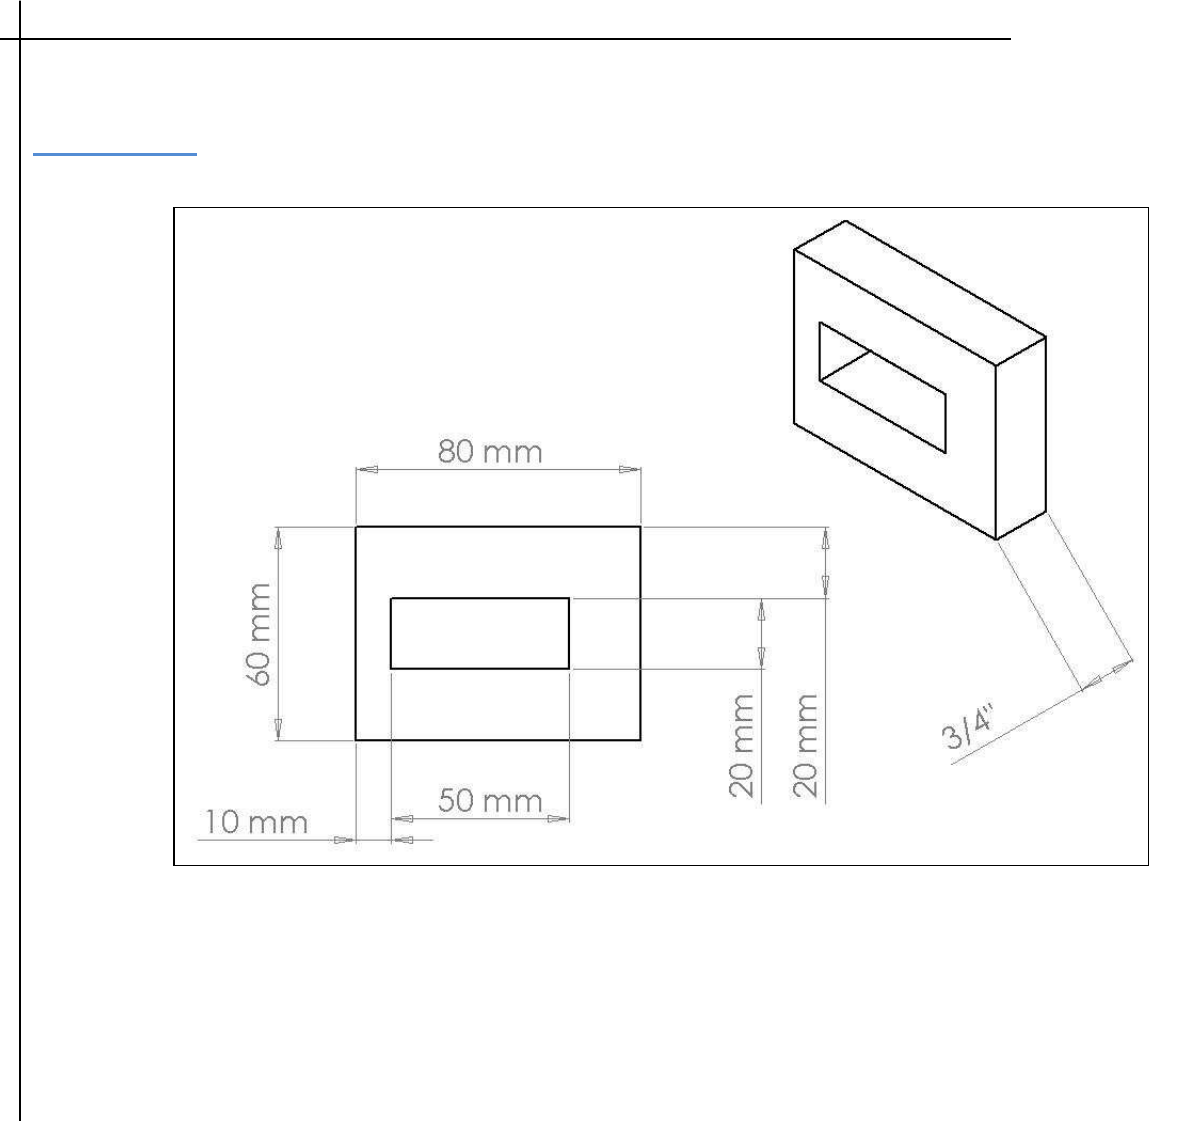
Drawing 2
:
Complete Dimensions
for Piece 2
STEM Academy: General Fabrication Methods Wood Puzzle
4
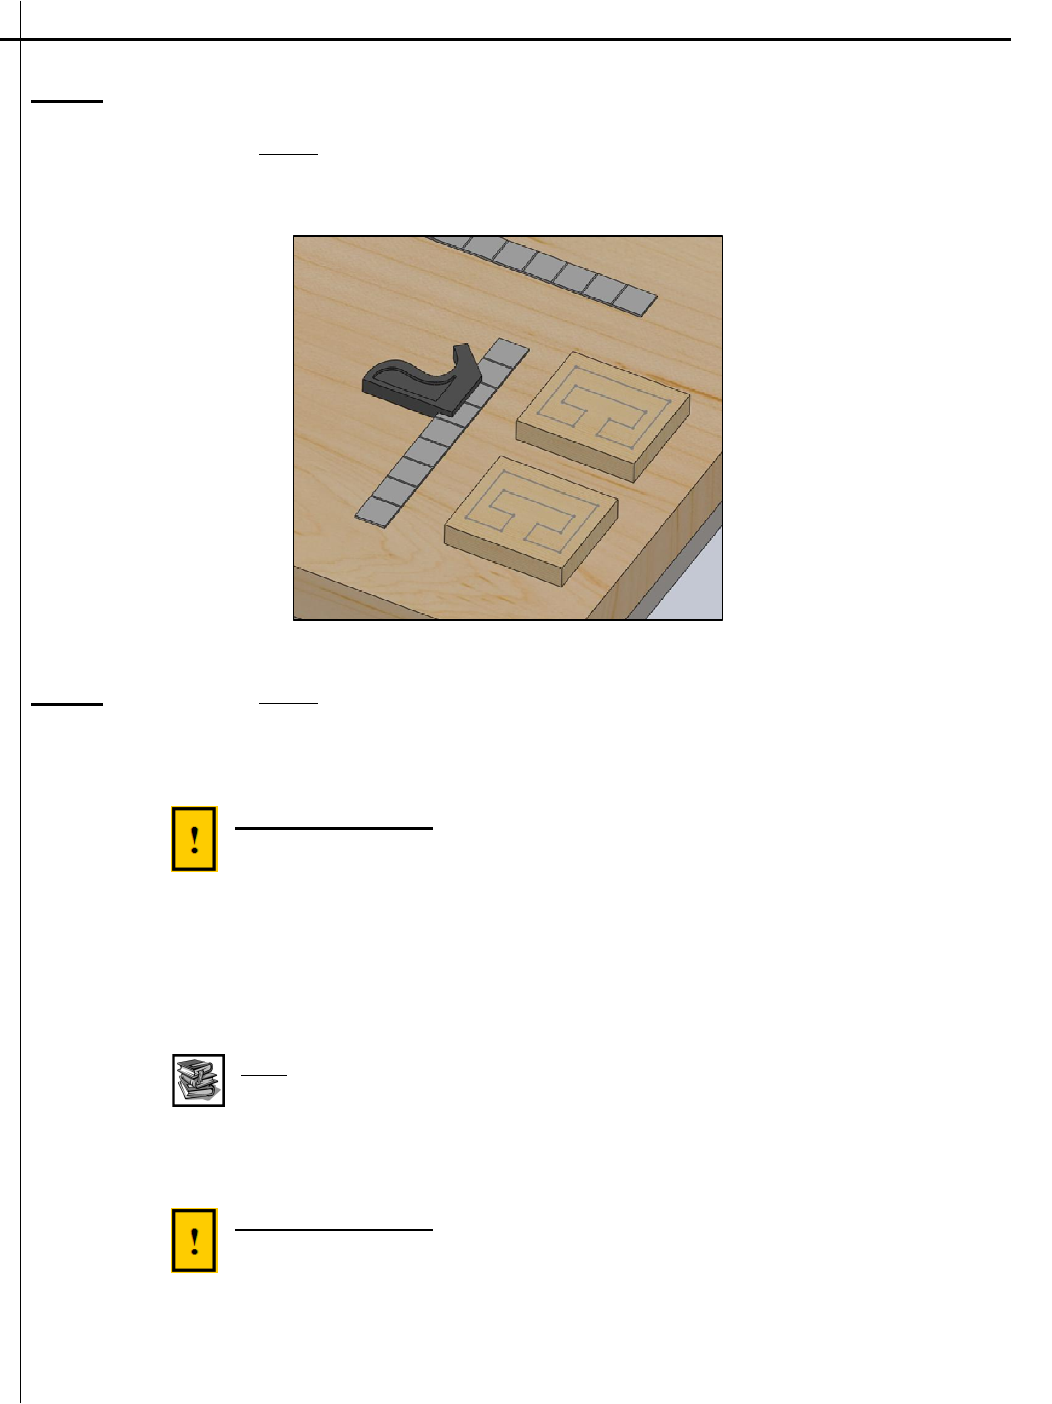
Step 1:
Lay out and cut two 100 mm long sections from 1” x 4” lumber stock using a
Combination Square, Pencil, and a Miter Saw.
Note: Using the Combination Square ensures a rectangle with sides that are
perpendicular to each other.
Pitfall prevention: It is important not to mark both pieces before cutting. Due
to the width of the saw blade, if both lines are marked at once, the first cut will
throw off the second mark by the width of the blade.
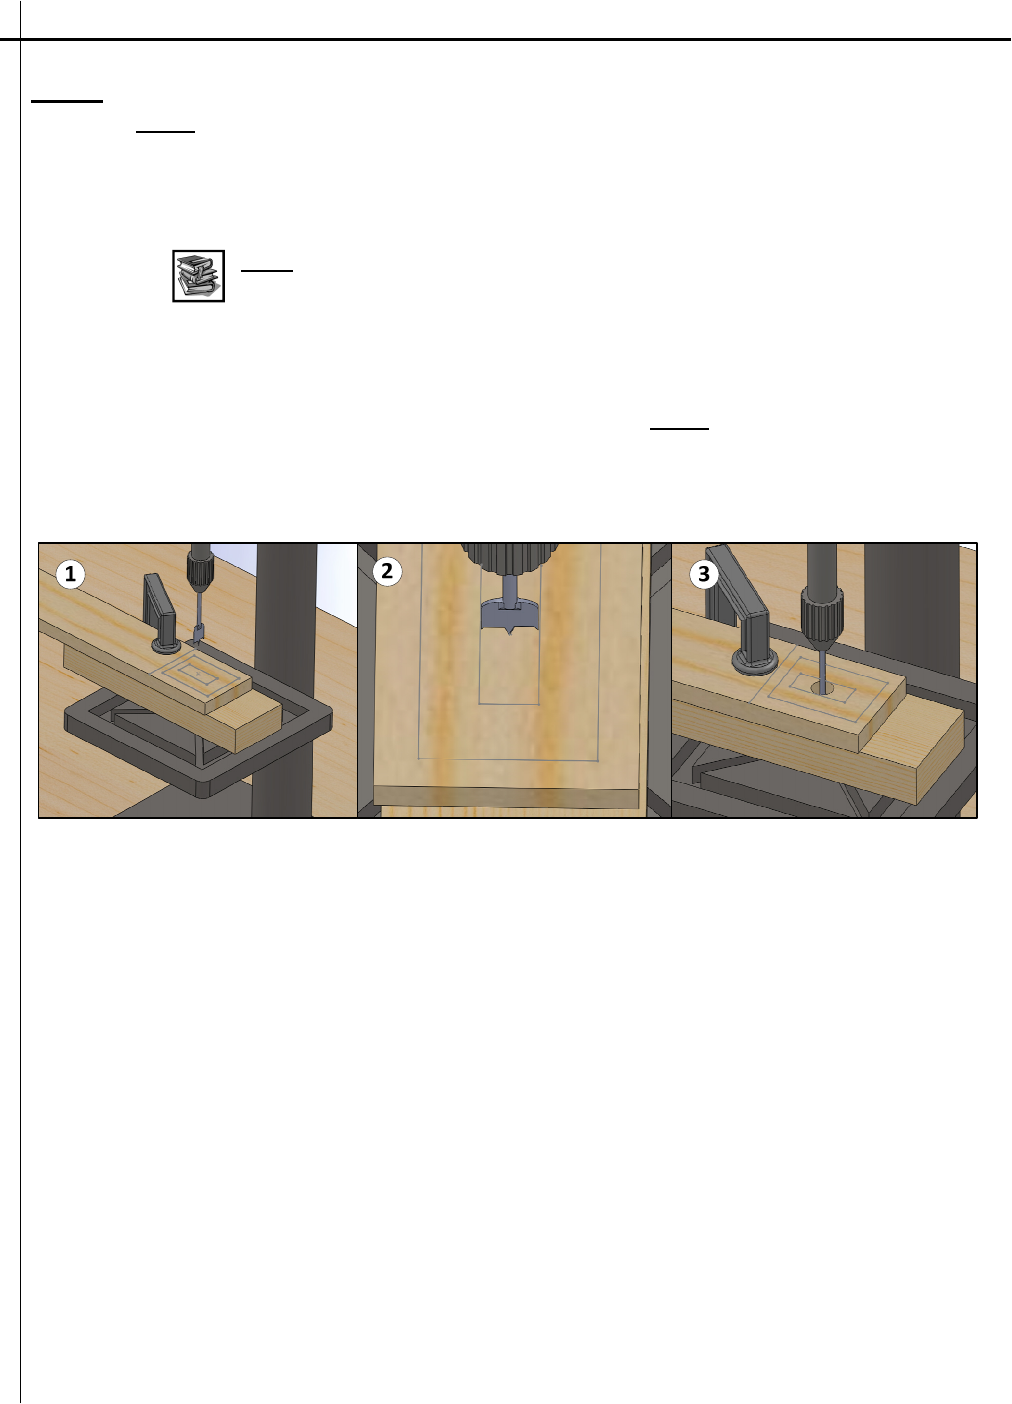
A. Use the Combination Square, and a
Pencil to mark out a
100 mm section on the
lumber stock as show in Figure 1.
Note: The pieces shown in Drawings 1 and 2 are only 80 mm long, yet the
procedure calls for the sections to be cut 100 mm long. This is done to pare
down the rough lumber into smaller sections that are easier to work with on the
band saw.
B. Cut the 100 mm sections using the Miter Saw
.
C. Place the board on the Miter Saw table so the 100 mm mark is close to the blade.
Place a shim that is the same height as the miter saw table underneath the end of the
board farthest away from the saw as shown in Figure 2.
Note: Putting a shim under this side of the board will allow the saw to make a
90º cut with the top of the board.
D. Next position the board so the 100 mm section is to the right of the saw blade. Then
position the line directly to the right of the blade as shown in Figure 3. If the line is
positioned directly under the blade, the 100 mm board will be half a blade’s width
short of 100 mm. Clamp the board snug against the back of the Miter Saw. This can
be done with the clamp on the saw.
E. With all objects away from the blade and Safety Glasses on, turn on the saw and
slowly lower it into the wood
STEM Academy: General Fabrication Methods Wood Puzzle
5
Figure 1:
Laying out 100mm piece
Figure 2:
Propping up the board with a shim
Figure 3:
Cutting the piece
-
(1
-
2) Align blade to the side of the line opposite of the
desired piece. (3) While the saw is on, slowly enter the blade into the wood and
complete the cut.
STEM Academy: General Fabrication Methods Wood Puzzle
6
Step 2:
Layout two of Piece 1 using the Combination Square, Straight Edge, Pencil, and the
dimensions found in Drawing 1: Complete Dimensions Piece 1 (page 3) on the two
pieces cut in Step 1.
A. Draw all of the edges of the piece on a 100 mm section. The width of the Piece 1 is
already the size of the lumber.
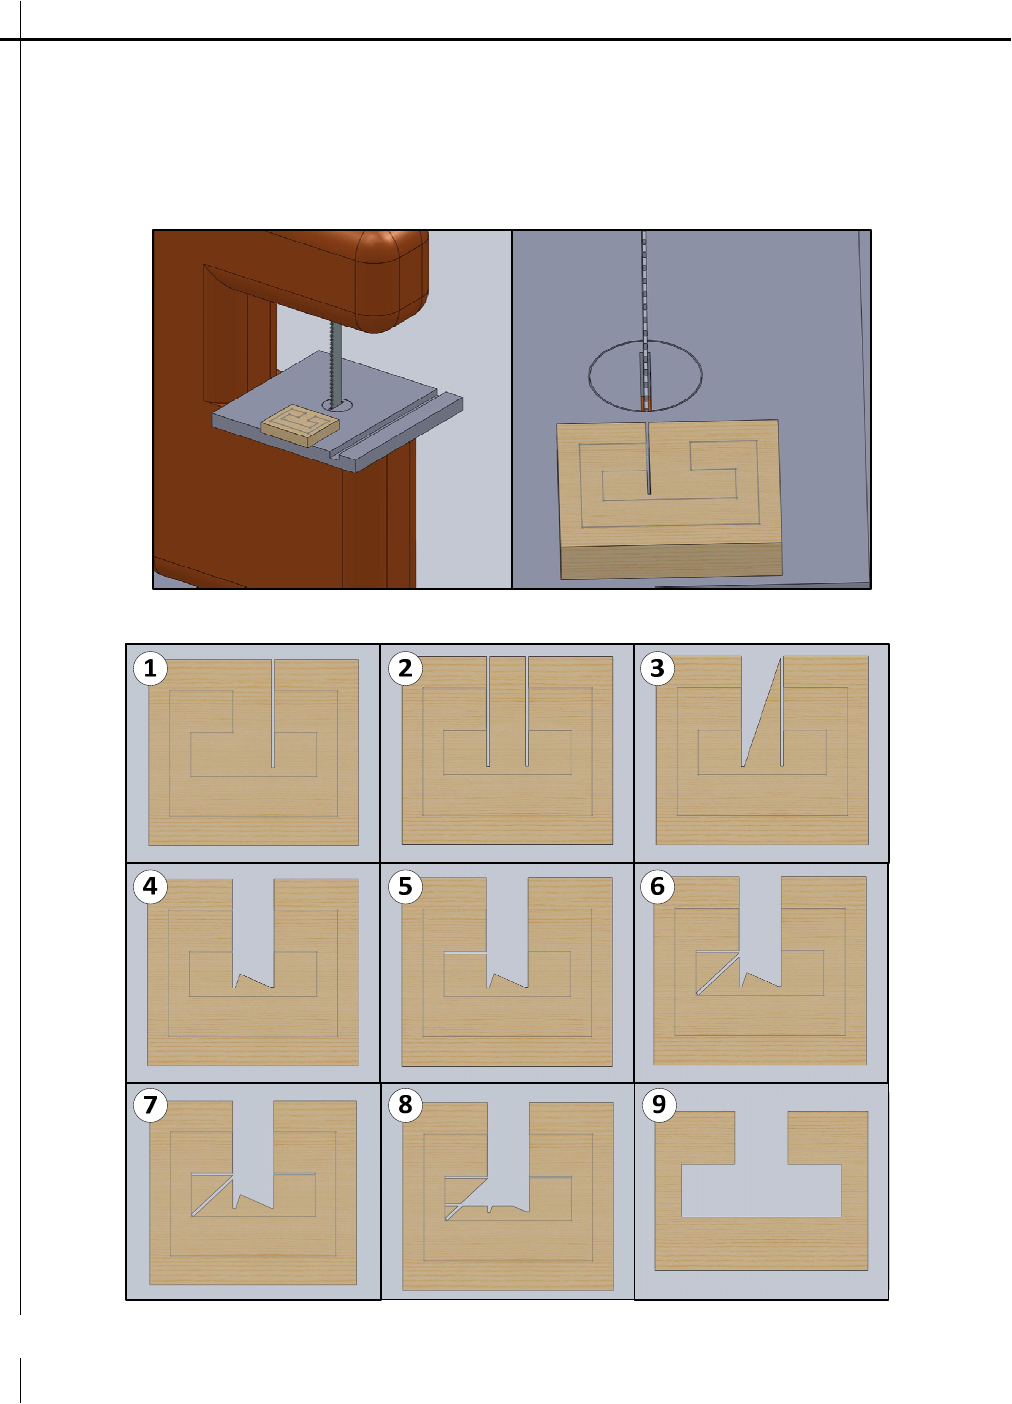
Step 3:
Cut out both Step 2 layouts using the Bandsaw.
A. Put Safety Glasses on everyone in the group.
B. Remove all objects from the table of the Band Saw.
SAFETY WARNING:
Before starting the saw, make sure ALL objects AND the
work pieces are removed from the table of the band saw. Objects, including the
100 mm sections can become pinched between the blade and the table and
thrown from the machine, possibly hurting others nearby.
C. Turn on the Band Saw.
D. Place the 100 mm section on the table of the Band Saw.
Note: When making a cut with a band saw, the blade should be offset to the
side opposite the desired piece. Due to the width of the saw blade, if you cut
down the center of the drawn line, your piece will be half the blade’s width
smaller than what you measured.
SAFETY WARNING:
Keep your fingers as far away from the blade as possible
while mantaining a firm grasp of the 100 mm section.
E. Slowly bring the 100 mm section into contact with the blade of the Band Saw
Figure 4:
Two pieces with layout of piece one
STEM Academy: General Fabrication Methods Wood Puzzle
1
A. Slowly feed the 100 mm section into blade until line is fully cut. See Figure 5.
B. First cut out the inside lines. When cutting the inside of the piece, make smaller sub
cuts until the correct lines are cut as shown started in Figure 6.
C. Next, cut the outside lines.
Figure 5: Cut the inside lines first. Make sure to cut on the scrap wood side of the line
Figure 6: Example of sub cut order. Make sub cuts to clear all inside scrap.
STEM Academy: General Fabrication Methods Wood Puzzle
2
Step 4:
Lay out one 100 mm long section from 1” x 4” lumber stock using a Combination
Square, and a Pencil
Note: Do not cut the 100 mm section apart from the rest of the 1” x 4” lumber
stock.
Step 5:
Lay out Piece 2 using the Combination Square, Straight Edge, Pencil, and the
dimensions found in Drawing 2: Complete Dimensions Piece 2 (page 4) on the 100 mm
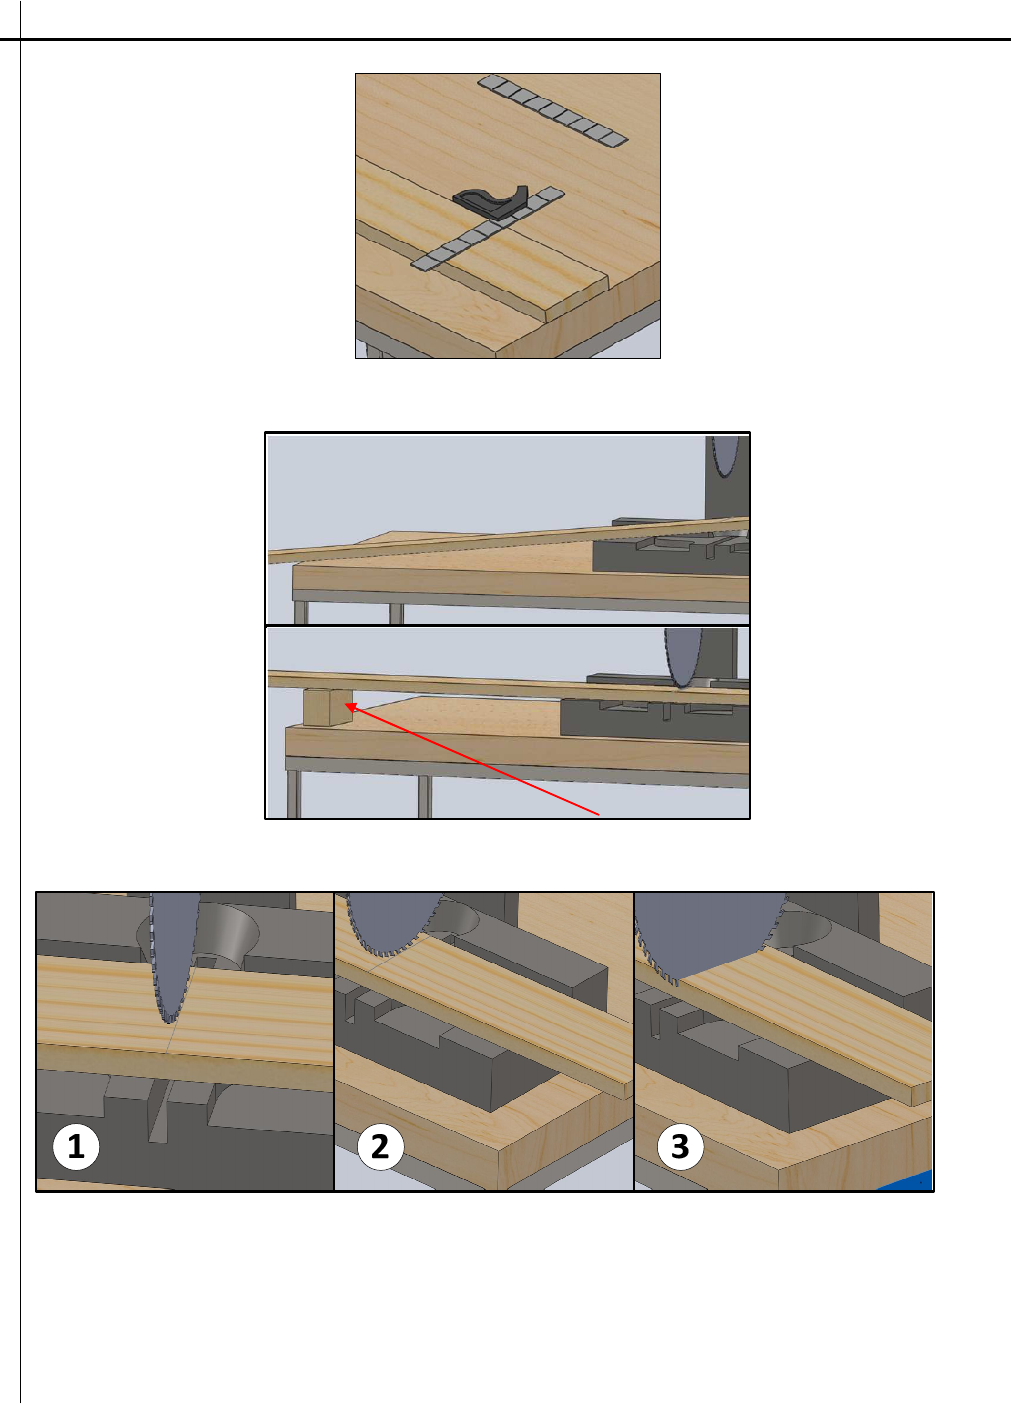
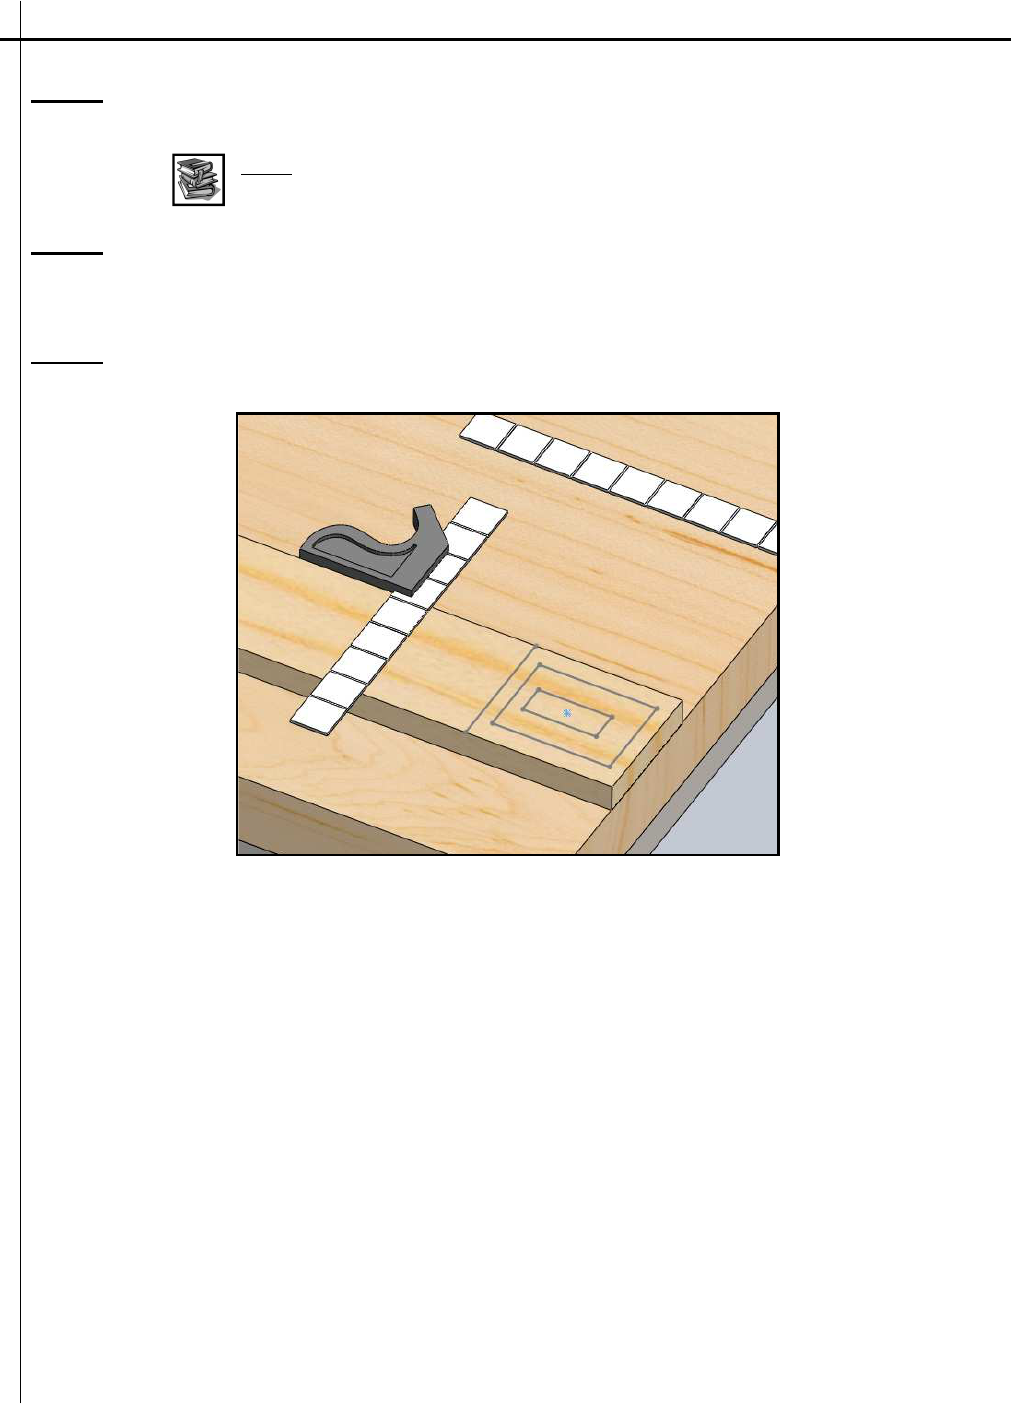
section layed out on the 1” x 4” lumber Stock as shown in Figure 7.
Step 6:
Locate and mark the center of the inside cutout of Piece 2 with the Straight Edge, and a
Pencil as shown in Figure 7.
Figure 7:
Layout of Piece 2 on the stock lumber. Mark the
center of the ins
ide square
STEM Academy: General Fabrication Methods Wood Puzzle
3
Step 7:
Using a 3/4" Spade Bit, bore a hole though the center of the Piece 1 layout as marked in
Step 6 using a Bar Clamp, Scrap Wood, and the Drill Press.
A.
Clamp the layout on top of a piece of Scrap Wood that is at least 1” thick to the Dril
Press as shown in Figure 8.
Note: A piece of scrap wood is placed underneath the lay out because the
Spade Bit is wider than the hole in the drill press table. If the scrap wood is
not present during the drilling procedure, the spade bit will run into the table
before the hole is completely drilled, ruining the bit and drill press table.
B.
With the bit aligned with the center mark drawn in Step 6 and safety glasses on, start
the drill press and slowly push the drill bit through the wood until the hole is
completely through the top piece of wood as shown in Figure 8.
Figure 8:
Drilling the center hole
-
(1) Clamp stock lumber onto drill press with 1” scrap beneath. (2)
Align up the spade bit with the center mark. (3) Slowly enter the spade bit into the wood, making sure not to
go deeper than the scrap to p
revent running into the drill press table.
STEM Academy: General Fabrication Methods Wood Puzzle
4
Step 8:
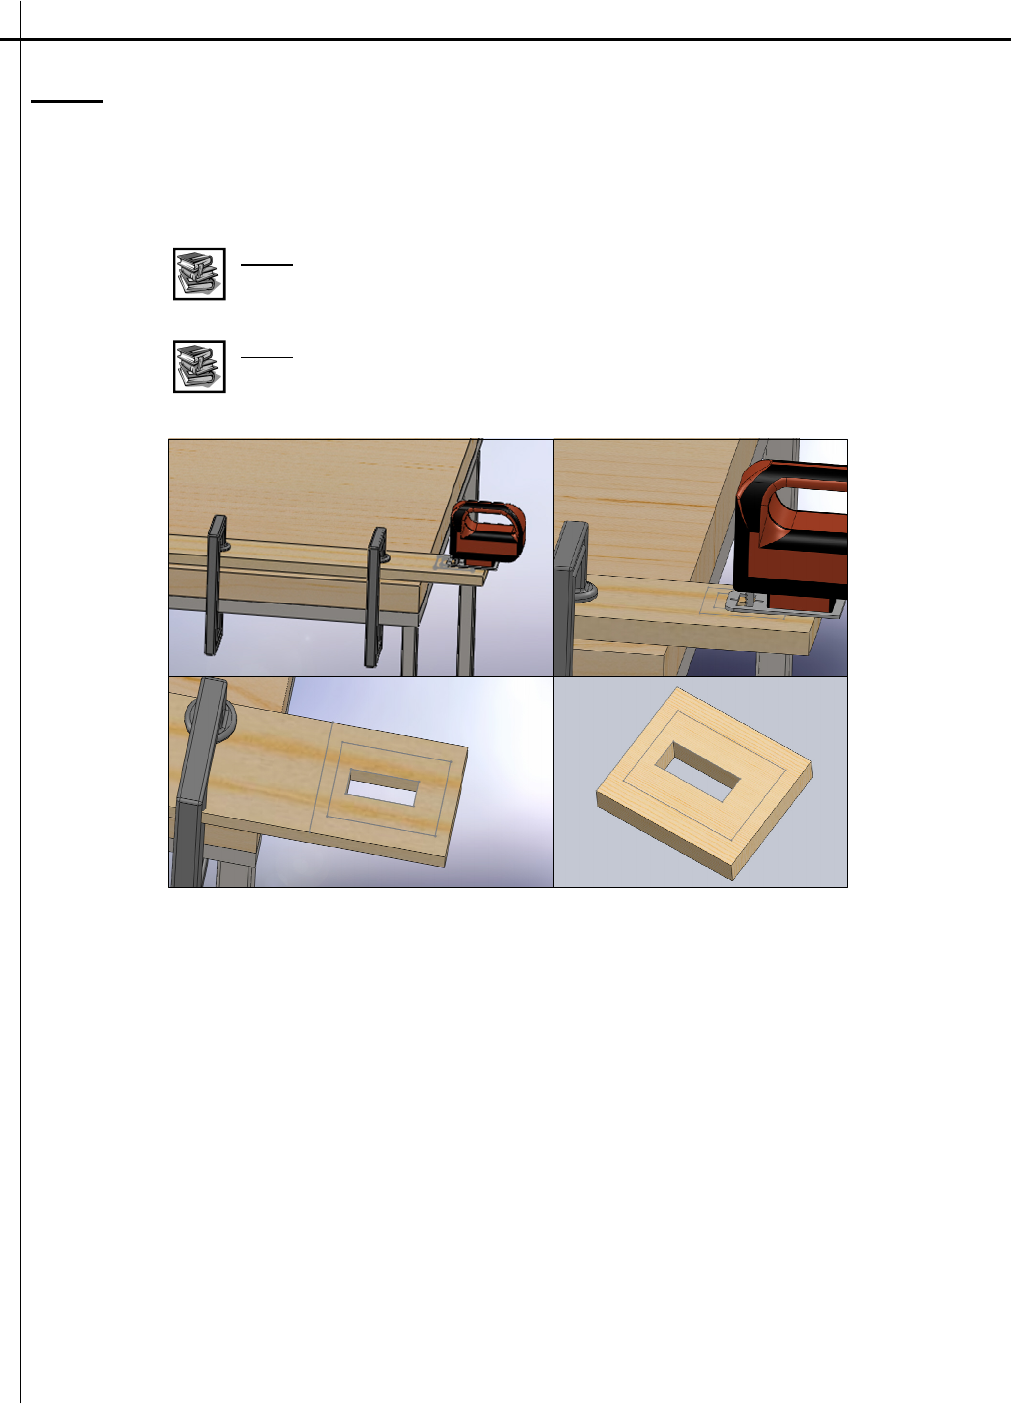
Cut out the inside pocket of Piece 2 using two Bar Clamps, and a Jig Saw.
A
.
Position the sketch of Piece 2 over the edge of the table and clamp the wood snug with
two Bar Clamps as shown in Figure 9.
B. Using a Jig Saw, cut the inside pocket out as shown in Figure 9.
Note: To get the feel of the jig saw, it may be helpful to clamp a scrap piece of
wood to the table and practice cutting with the jig saw before cutting Piece 2
out.
Note: This cut would ideally be done with a scroll saw. To get proficient at
fabrication, one must learn to improvise with what is available. On that note,
improvise with safety and caution.
Figure 9: Clamp the stock lumber to the table with two 12” bar clamps
with the layout hanging over the edge. Use the jig saw to cut out the
center of the block. Be careful and take your time. Use several cuts to
clear all of the scrap.
STEM Academy: General Fabrication Methods Wood Puzzle
5
Step 9:
Cut 100 mm section of Piece 2 from the 1” x 4” stock lumber using the Miter Saw, using
the procedure outlined in Step 1.
Step 10:
Finish cutting out Piece 2 using the Band Saw, and the procedure outlined in Step 3.
Step 11:
Hand sand each of the three pieces with 80, 120, and 180 grit sandpaper to remove any
blade marks and rough edges
Note: Sandpaper is measured by the size of the abrading particles bonded to
the paper. Big grit numbers are fine sandpapers that have small particle sizes
and small grit numbers are course sandpapers that have big particles. The finer
the sandpaper, the smoother the finish it will leave.
A. When sanding wood, always sand with the grain. Start with course grit sandpaper to sand
out all the deep scratches and cut marks. After all the major scratches are out and the
wood is not becoming any smoother, switch to the next size grit sand paper and repeat the
process. Finally, use the 180 grit sand paper until the wood has not apparent change in
texture.
B. Try fitting the pieces together as shown if Figure 12. If they do not fit together, figure out
what is binding and either sand or saw the pieces until they properly fit together.
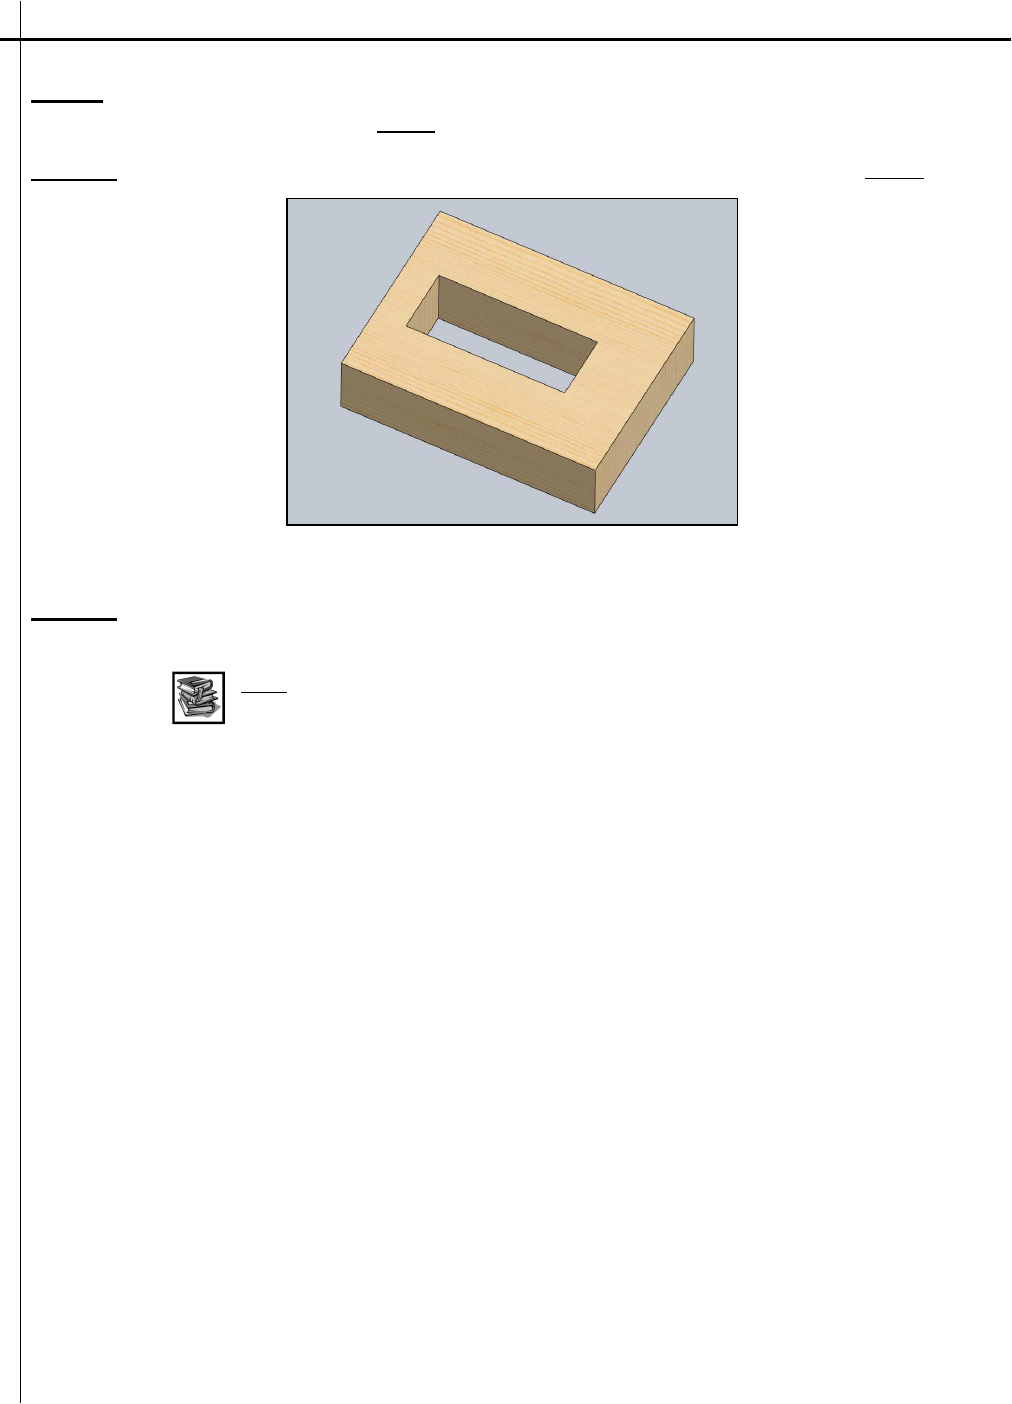
Figure 10: Finished Piece 2
STEM Academy: General Fabrication Methods Wood Puzzle
6
Step 12:
Finish the puzzle pieces by adding Rubbing Oil to stain the wood using a Cheese Cloth.
Note: Rubbing oil can be applied to as many of the pieces as the team wants as
shown in Figure 11. At least one piece must be stained.
A. Cover the the work area with scrap paper so the rubbing oil does not stain the work
area.
B. Follow the directions on the Rubbing Oil very carefully and apply it to the puzzle
pieces using Cheese Cloth. Becareful not to spill the rubbing oil on your clothes or
table as it will stain. Dispose of Cheese Cloth as directed on Rubbing Oil container.
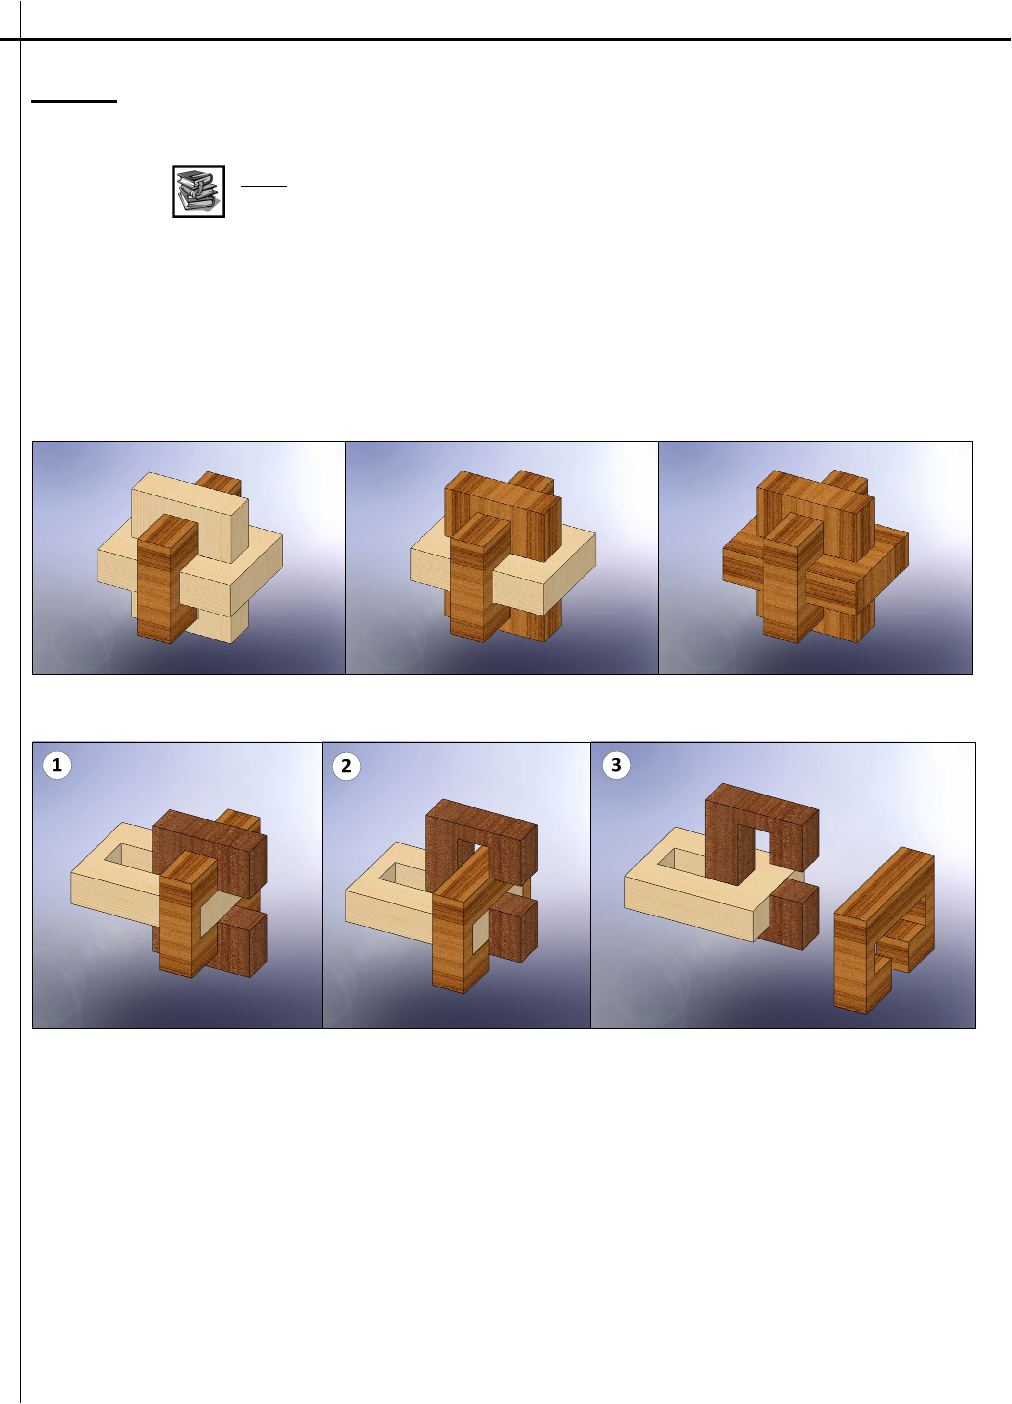
Figure 11: Variations on how many of the pieces are stained
Figure 12: Assembly/disassembly of puzzle directions